
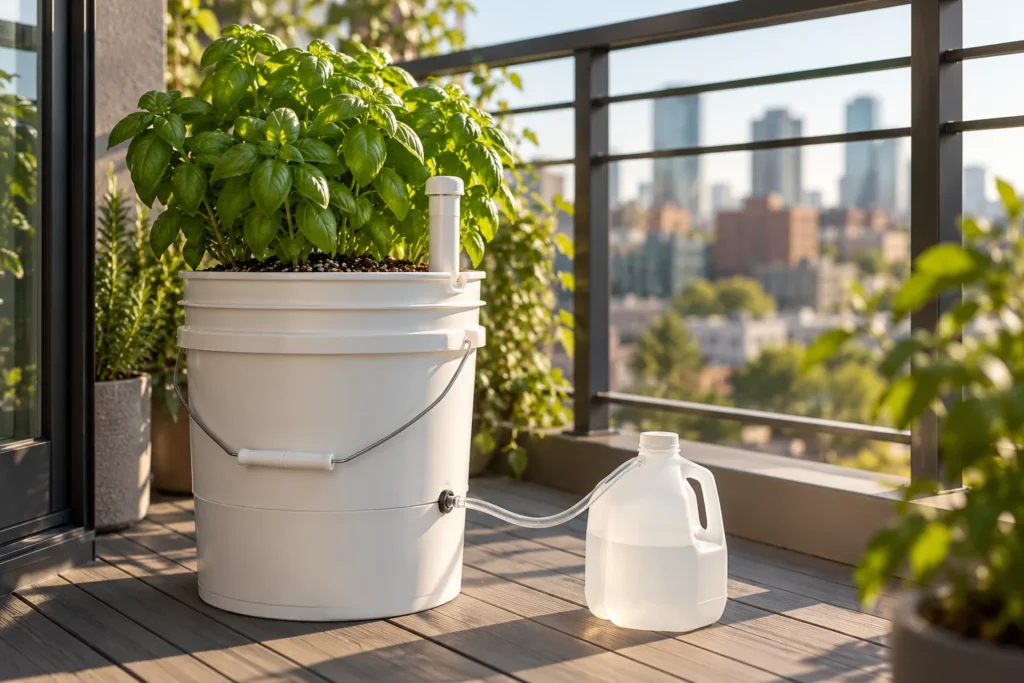
You get back from a long summer weekend, slide the balcony door open, and the tomato in the railing pot has folded over like a wet paper towel. The mix has shrunk away from the sides of the pot, and the one fruit that was finally coloring up has split down the side.
If you rent, the usual fixes are off the table. You can’t run a drip line through the wall, you can’t bolt a timer to the railing, and the neighbor below keeps a patio chair parked right under your floor. A self watering container DIY for balcony use gets around all three: two nested buckets, a wicking column and a fill tube turn a plain 5-gallon bucket into a planter that waters itself from below for days, with the overflow caught in a jug instead of landing downstairs. (If you own the wall or fence, our guide to building a vertical garden wall walks through a full drip setup.)
The build takes one afternoon, the parts come from a single hardware-store trip, and the whole thing goes with you on moving day. It’s also the simplest way to keep a tomato in a pot on a balcony evenly watered through July.
In a small apartment with a cat and a dog, I’ve noticed that anything holding water at floor level gets investigated fast, so the build below caps the fill tube and covers the jug.
Table of Contents
At a Glance
- Two nested 5-gallon food-grade buckets, a 4-inch wicking column, a 1-inch fill tube and one overflow hole make a container that waters itself from below for days.
- Water climbs only about 4 inches above the overflow level, so the reservoir stays shallow and the mix above it stays moist without going soggy.
- Build time is one afternoon with a drill, two hole saws and a utility knife; the cost level is low.
- In full summer sun with a tomato, plan on topping up about daily; herbs or greens in part shade stretch that to several days.
- Catch the overflow in a jug so nothing drips onto the balcony below, cap the fill tube against mosquitoes, and drain the reservoir before the first hard freeze.
This self watering container DIY for balcony use suits renters with a sunny spot who grow one tomato, one pepper or a bucket of basil and travel in summer.
How a Self-Watering Container Works (and Who Should Skip It)
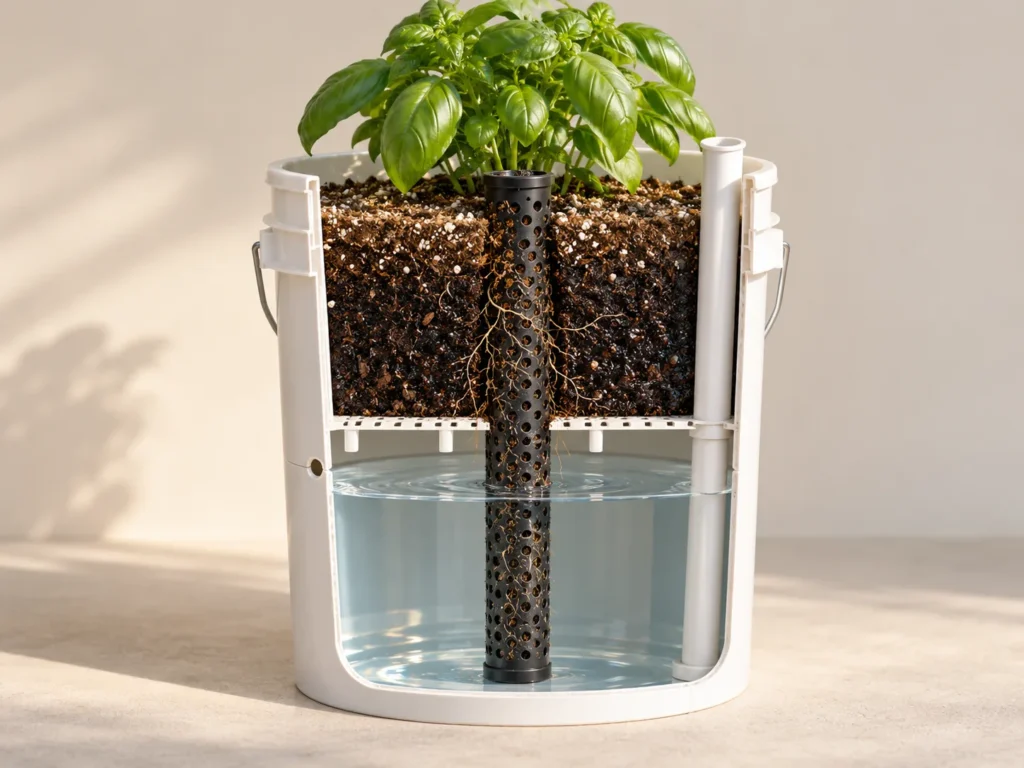
A self-watering container is a planter with a water reservoir underneath the potting mix and an overflow hole on the side instead of drainage holes in the bottom. Water moves up into the mix by capillary action, and the plant’s roots take it from there.
Picture the layers: mix on a perforated platform above a pool of water, with a column of mix reaching down into that pool. Water wicks up the column and spreads sideways, and the overflow hole caps the pool so the roots never sit in it.
That 4-inch figure is the number behind every dimension in this build. University of Kentucky’s wicking-container plan found that water rises only about 4 inches above the drain-hole level, which is why the reservoir is shallow, why the overflow sits right under the inner floor, and why the top inch of a tall bucket feels dry while the roots below are happy. That dry top is the design working, not failing.
Sun decides what you can grow in it. Fruiting crops such as tomatoes, peppers and eggplant want 6 to 8 hours of direct sun, while leafy and root crops put up with light shade, so a north-facing balcony means greens and herbs. If you’re still choosing, container vegetable ideas for beginners sorts crops by light.
Two balcony cautions belong here too. A dark bucket in full summer sun overheats, which damages roots and dries the mix faster, so pick a white or light-colored bucket or shade the sunny side with a board. Containers of 5 gallons or more get heavy once they’re wet, and extra weight is a real concern on balconies and decks, so read your lease and building rules before you line up three of these.
Who should skip this build? Anyone growing plants that rot in constantly moist mix, such as succulents, rosemary, lavender or thyme. Anyone who can’t comfortably lift a full bucket. And anyone whose lease limits planters, watering or anything left on the floor.
What You’ll Need
Everything on this list comes from one hardware store trip, and the two buckets are often free from a bakery or deli. The cost level is low; the hole saws are the only items most apartments don’t already own.
| Item | What it does | Spec | Cost level |
|---|---|---|---|
| Two 5-gallon buckets | Inner holds the mix; outer is the reservoir | Food-grade, same size so they nest | Low (often free) |
| Perforated drain pipe section | Wicking column | 4-inch diameter, standing a few inches above the inner floor | Low |
| Rigid PVC tube | Fill tube | 1-inch outer diameter, a few inches taller than the bucket | Low |
| Removable cap | Keeps mosquitoes and pets out of the tube | Fits the 1-inch tube | Low |
| Soilless potting mix | Growing and wicking medium | Bagged peat or coir mix, moistened before use | Low to mid-range |
| Milk jug and short tubing | Overflow catch | Empty 1-gallon jug; 6-inch length of 1/2-inch tubing | Low (free) |
| Plastic bag or sheet (optional) | Mulch cover against evaporation | Covers the rim, with a planting slit | Low |
Tools: a drill with 1/4-inch and 3/4-inch bits, 1-inch and 4-inch hole saws, a utility knife, a hacksaw, a tape measure, work gloves and eye protection. A hole saw grabs thin plastic hard, so wear the gloves and glasses even for a two-minute job, and clamp or brace the bucket.
On the buckets: food-grade plastic is the safest choice for anything you’ll eat, and soil shortens the life of cheaper non-food plastics, so a bakery frosting bucket beats a hardware-store paint bucket. Skip any bucket that held chemicals, paint or cleaning products, however well it’s been rinsed.
No drill, no hole saw and no one to borrow them from? A purpose-built self-watering planter is the honest shortcut.
Step-by-Step: Self Watering Container DIY for Balcony Growers
The inner bucket holds the mix and the wicking column; the outer bucket is the reservoir. Every hole you cut has one job, and the order below keeps you from cutting the wrong bucket.
Step 1: Wash and Check Both Buckets
Scrub both buckets with dish soap and hot water, then check for cracks, a warped rim and any whiff of the previous contents. Nest them to confirm they fit, and pick the slightly smaller or more flexible one as the inner bucket; it’ll be easier to lift out later.
While they dry, tip your potting mix into a tub and work in water until a squeezed handful holds together without dripping. Dry peat-based mix shrugs off water for a long time, so moistening it now saves a frustrating first fill.
Step 2: Cut the 4-Inch Wicking Hole
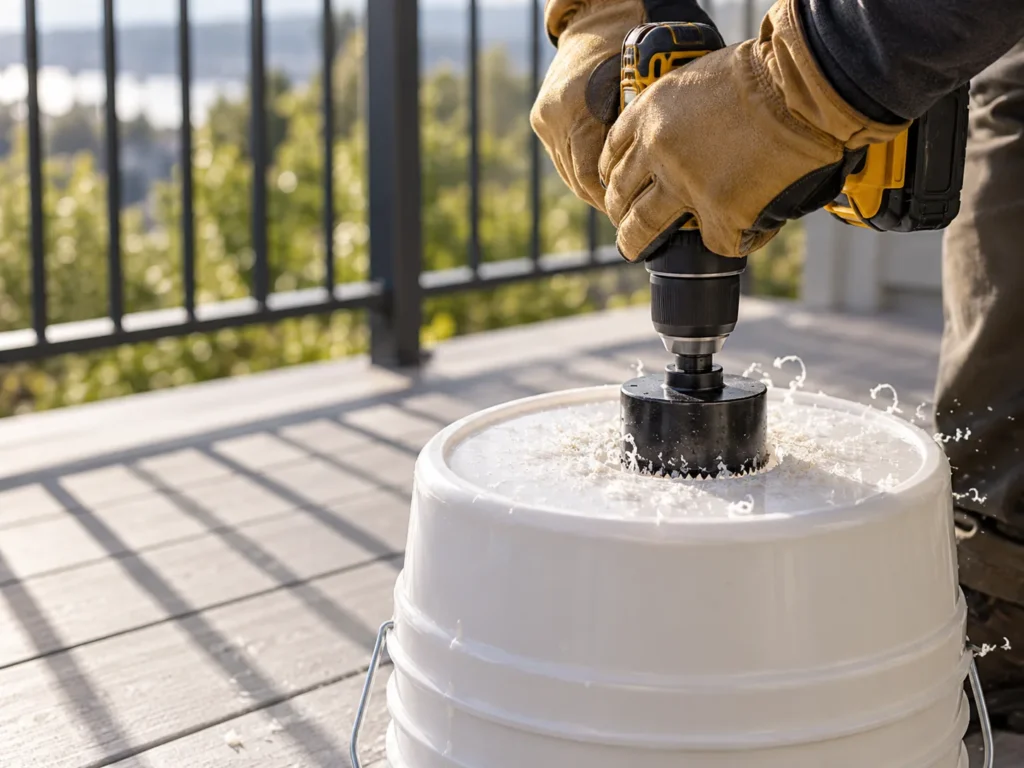
Turn the inner bucket upside down and cut a 4-inch hole in the exact center of the floor with the hole saw. This hole takes the drain-pipe column, so it should be snug enough that the pipe stands upright on its own.
Run the drill slowly and let the pilot bit settle before the teeth touch the plastic. If the saw skates, stop and re-seat it; forcing it is how buckets crack and gloves get bitten.
Step 3: Cut the Fill-Tube Hole and Drill the Drainage Holes
Still on the upturned inner bucket, cut a 1-inch hole near the edge of the floor for the fill tube, then drill 20 to 30 holes with the 1/4-inch bit across the rest of the floor, an inch or two apart and clear of the two big openings. The small holes let excess water drain back into the reservoir and let air reach the roots from below, which keeps a wicking container from turning sour.
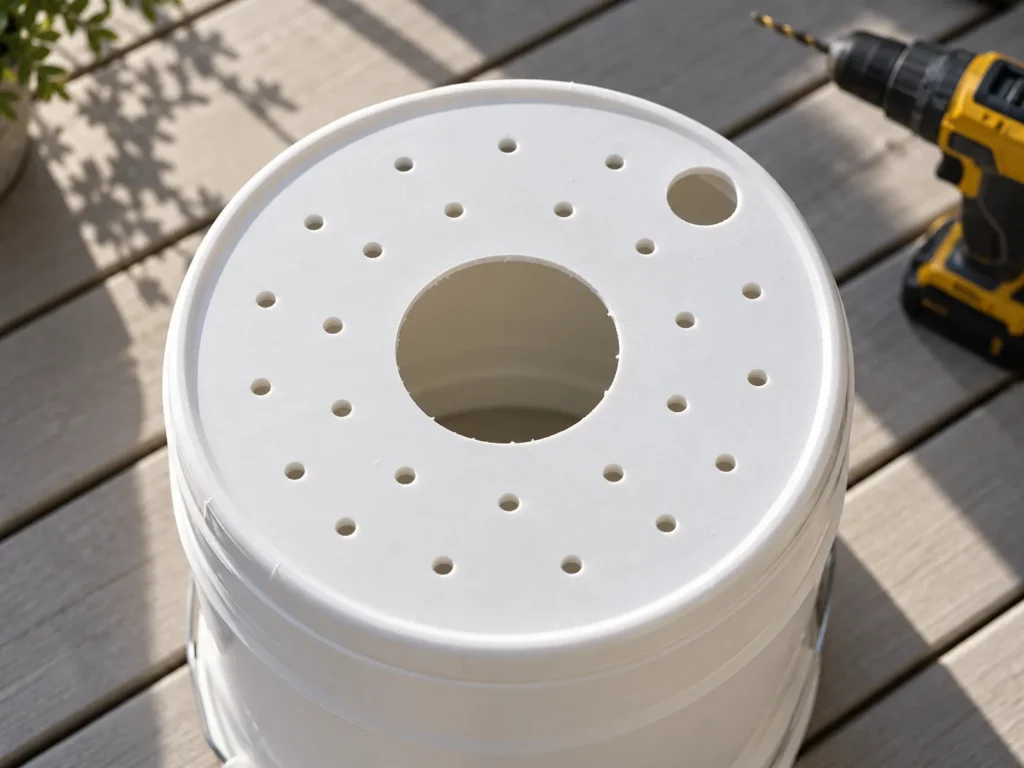
Step 4: Nest the Buckets and Drill the Overflow Hole
Set the inner bucket inside the outer one, push it down until it seats, and mark the outer bucket just below where the inner floor sits; if you can’t see it, stand the two buckets side by side with the rims level and mark the gap under the inner floor. Drill the overflow hole there with the 3/4-inch bit, so the overflow tubing in Step 5 fits snugly, following the UF/IFAS two-bucket layout that places it right under the upper bucket’s base.
This is the one cut you can’t fudge. The overflow hole sets the water line, so if it ends up above the inner floor, the mix sits in standing water and you’ve built a swamp. If the hole lands too high, drill a fresh one lower and seal the first with waterproof tape or silicone on both sides.
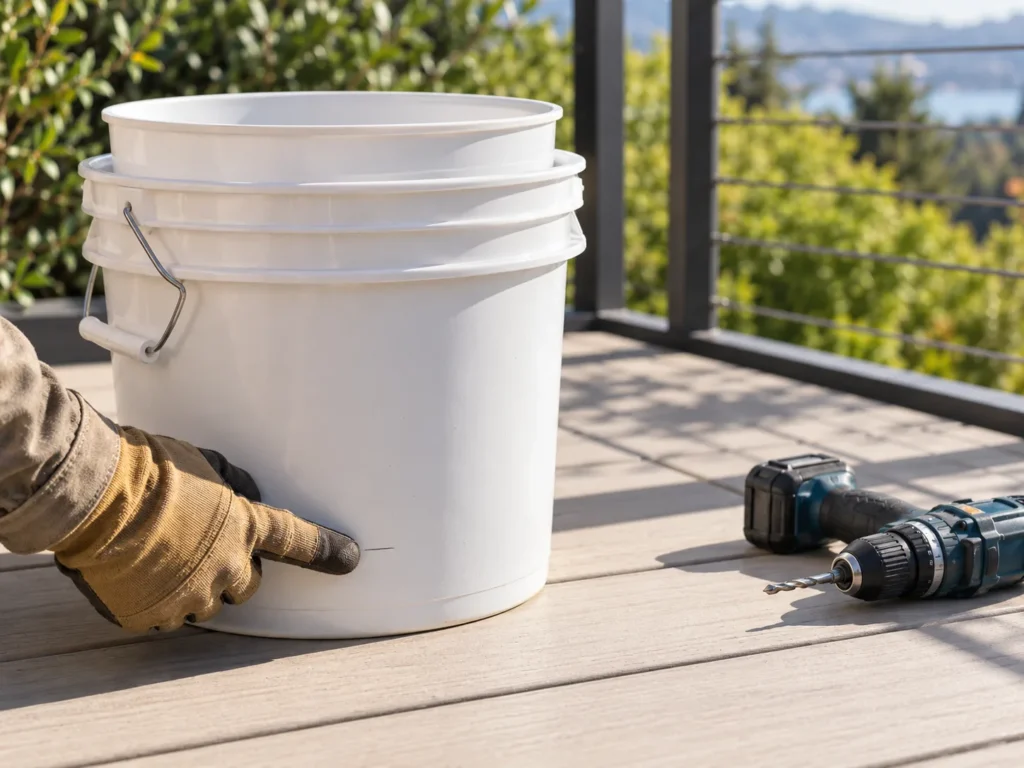
Step 5: Fit the Overflow Catch
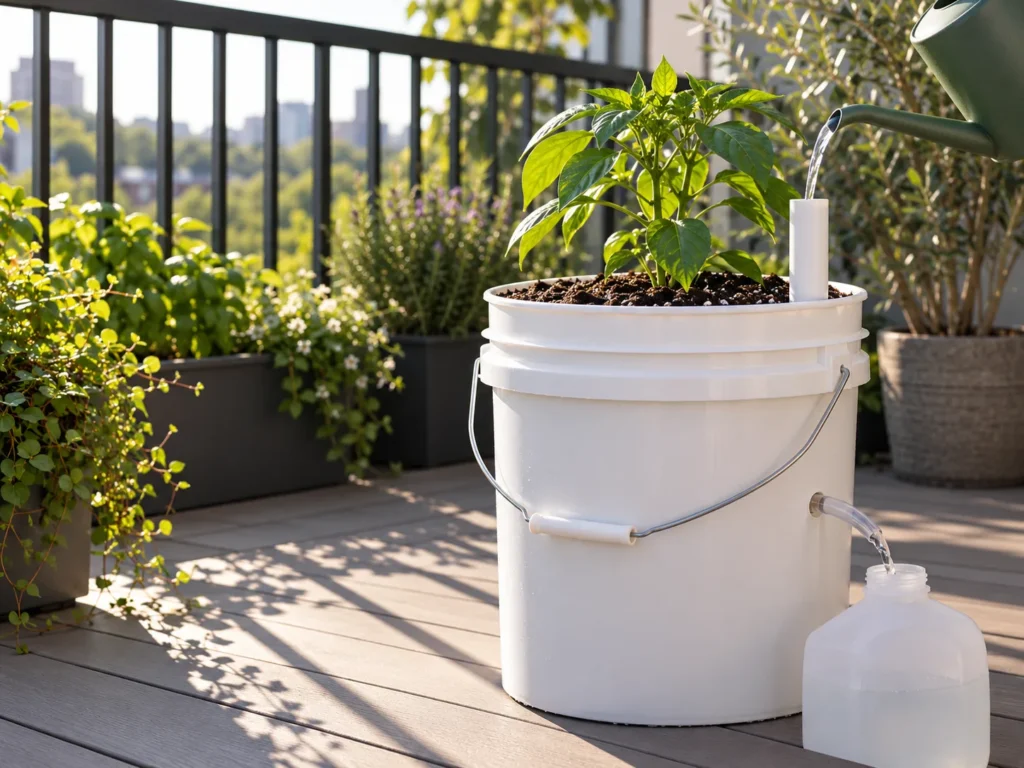
Wrap one end of the 6-inch length of 1/2-inch tubing in electrical tape until it fits the overflow hole snugly, then push it in a short way, pointing outward. Set the bucket on a cinder block or a pair of bricks about 8 inches high so the tube runs downhill into the jug, with the block sitting flat and the bucket backed against a wall. Cut an X in the shoulder of the milk jug with the utility knife, seat the free end of the tubing in it, and set the jug beside the bucket. Every drop that leaves the overflow now lands in the jug, and the University of Maryland design this comes from has you pour that water straight back in at the next fill.
This is the renter step. Nothing runs across the floor, nothing drips through the decking, and the neighbor downstairs never knows you’re gardening. We’d fit the jug even on a ground-floor patio, because the water it catches carries the dissolved fertilizer you just paid for. Our small patio garden makeover ideas show where a few of these containers fit in a full layout.
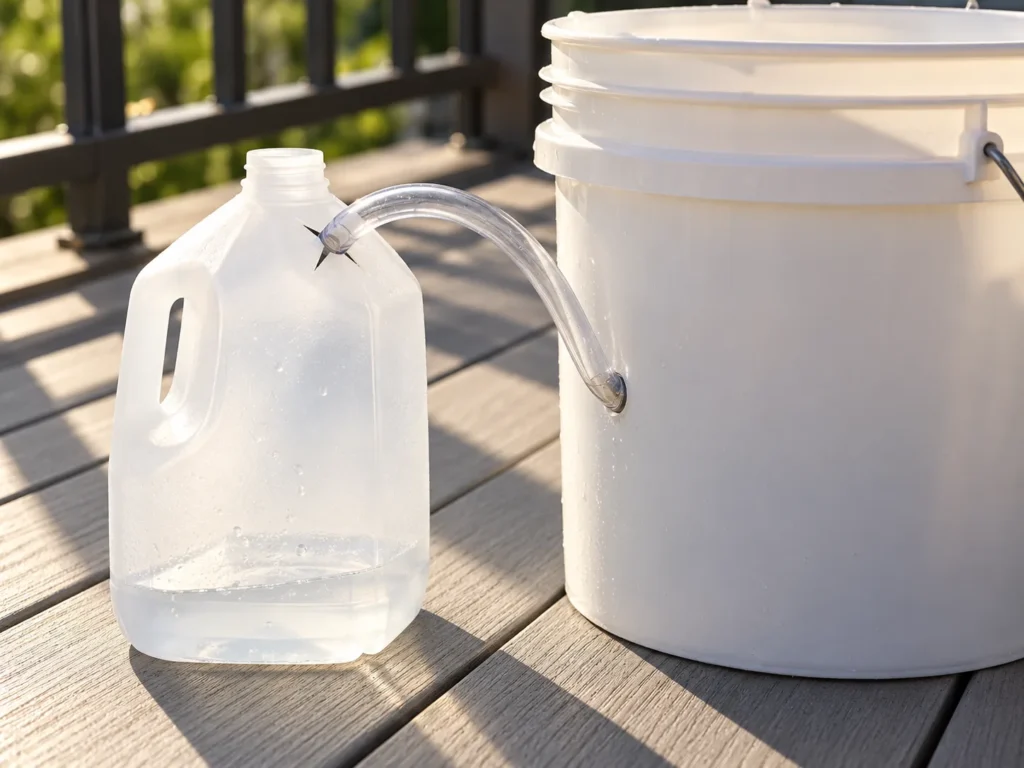
Step 6: Cut and Fit the Fill Tube
Measure the inner bucket from floor to rim, add a few inches, and cut the 1-inch PVC to that length with the hacksaw. Cut the bottom end at a 45-degree angle so water can flow out even when it rests on the reservoir floor, then push it down through the 1-inch hole until the angled end touches bottom.
Fit the removable cap on top. An open tube is a mosquito nursery and a cat’s idea of a drinking straw, so the cap stays on except when you’re filling; the weekly routine that keeps larvae out of the jug is in How to Use It.
Step 7: Seat the Wicking Column and Fill With Mix
Drop the 4-inch drain-pipe section through the central hole so it rests on the outer bucket’s floor and stands a few inches above the inner floor. Pack it firmly with the moistened mix from Step 1, pressing out air pockets; a loosely filled column is the most common reason a new container fails to wick.
Fill the inner bucket with the same moistened mix, firming lightly, and stop about 1 inch below the rim so a top watering has somewhere to pool. Skip garden soil here: it packs tight and wicks poorly, which is why bagged soilless mix is the standard for containers.
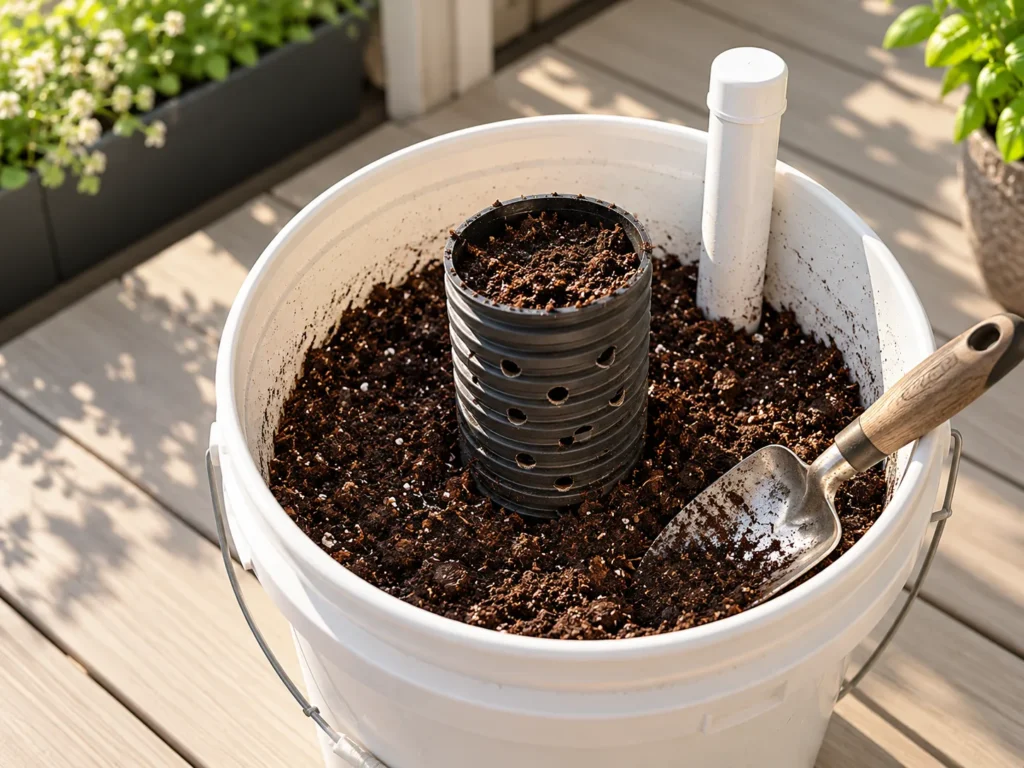
Step 8: Plant, Settle and Fill
Plant into the moist mix as you would any pot: one tomato, one eggplant or one pepper in a container this size, or a few basil plants. Water once from the top to settle the mix and start the wicking, then pour into the fill tube until water shows at the overflow and drips into the jug.
Expect the first fill to take more than you’d guess: a bucket holding about 4 gallons of moistened mix can take 2 to 3 gallons of water at the first fill, so keep pouring until the jug confirms the reservoir is full.
On a hot south-facing balcony, an optional plastic bag laid over the rim with a slit for the stem slows evaporation and can buy you a day between refills.
How to Use It
Fill through the tube, not over the soil, and stop when water shows at the overflow or drips into the jug. How often you do that depends more on your balcony than on the bucket.
The refill rule fits in two lines. A single bucket with a tomato in full July or August sun needs checking about daily and drinks roughly 1 to 2 quarts a day. Basil or greens in part shade stretch that to every few days, and the larger tub in Variations runs 3 to 5 days with a heavy plant load or 7 to 10 days with a light one.
Feeding is the part beginners forget, because the container handles the watering so well. A few gallons of mix run short of nutrients fast in summer, so feed a soluble fertilizer at label rate every two weeks or so, or at half strength with every fill, always onto moist mix. Every few weeks, water from the top with plain water until it runs into the reservoir to rinse out the salts that build up in a container only ever watered from below.
Skip that rinse and you’ll eventually see a white crust on the surface and brown leaf tips. The fix is a top flush with clear water, at least the volume of the container, repeated several times.
The CDC’s rule for anything around the home that holds water, planters and saucers included, is to empty, scrub, turn over or cover it once a week. Here that means the cap stays on the fill tube and the jug gets emptied and rinsed weekly whether or not it’s full.
Pets change the plant list more than people expect. The ASPCA lists the tomato plant (Lycopersicon spp.) as toxic to dogs and cats; the foliage can cause drooling, loss of appetite, severe stomach upset, weakness, dilated pupils and a slowed heart rate, while the ripe fruit is the exception. Basil (Ocimum basilicum) is listed as non-toxic to both, which is why for a first container we’d start with basil rather than a tomato: it forgives a missed refill, and a nibbling cat is a mess rather than an emergency. Check that list for any other plant before you buy; even a non-toxic plant can upset a stomach if enough gets eaten.
Fertilizer is the other pet hazard. Dogs will tear open a bag for the smell, and while most ingestions cause mild stomach upset, a large or moldy helping is more serious, so store it sealed and out of reach and keep pets off the balcony until anything applied is dry.
Wind matters on upper floors. A tall tomato in a 5-gallon bucket is top-heavy and small containers blow over easily, so push a stake into the mix inside the bucket on planting day rather than tying anything to the railing. Shallow-rooted, moisture-loving strawberries make a calmer second project; see growing strawberries in pots.
Summer-to-frost checklist
- Build day: top water once, then fill through the tube until the jug drips.
- Days 1 to 7: check the reservoir daily to learn your balcony’s rhythm, pouring the jug back in first.
- Every week: empty and rinse the jug; confirm the cap is on the tube.
- Every two weeks: feed as above.
- Midsummer: watch for white crust and flush from the top if it appears.
- Before the first hard freeze in your area: drain and tip the reservoir, then cover the container or move it under shelter so ice can’t crack the plastic.
If something goes wrong
| Problem | What you see | Likely causes | Fix |
|---|---|---|---|
| Top of the mix bone dry, reservoir full | Dry crust, wilting, water still in the reservoir | Column loosely packed or packed dry (most likely); column not reaching the water; mix too coarse | Lift the inner bucket, repack the column with moist mix, water once from the top |
| Mix soggy, plant yellowing | Wet surface, sour smell, yellow lower leaves | Overflow hole above the inner floor; overflow blocked; overfilled with no overflow | Fill and watch whether water exits; clear it, or drill a new hole lower as in Step 4 |
| Reservoir empties in a day | Daily top-ups, plant healthy | Full sun plus a big fruiting plant in July or August; wind; dark bucket heating up | Normal in midsummer; shade the sunny side, add the bag mulch, or move up to the tub |
| White crust, brown leaf edges | Surface crust, tip burn, slowed growth | Soluble salts from feeding without top watering | Flush from the top as described above; top water occasionally |
| Wrigglers in the jug or tube | Mosquito larvae in standing water | Open fill tube; jug left uncovered and unemptied | Cap the tube, empty and scrub the jug weekly |
Variations
Once one bucket works, the same four parts scale up or adapt. Pick the variation by how much you can lift and how much sun you have.
Muck tub or storage tote for more plants
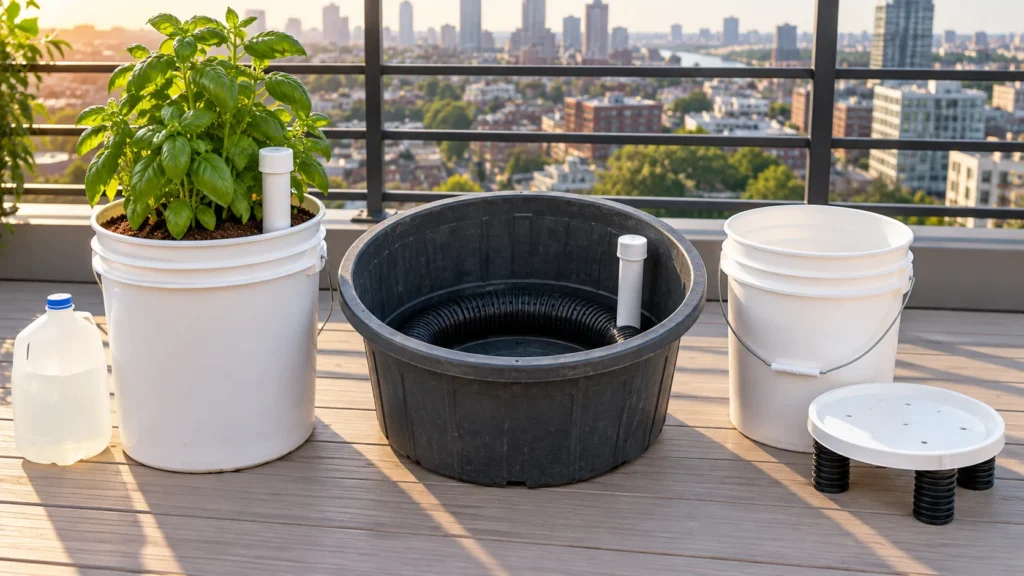
A 16-inch muck tub or a similar storage tote takes the same idea wider. Lay a ring of 4-inch perforated drain pipe around the inside of the base as the reservoir and wick, drill the drain hole about 4 inches up from the inside bottom, and fit a capped fill tube that stands about 2 inches above the rim. A tub that size has a reservoir of roughly 3.4 gallons, which is where the 3-to-10-day refill range in How to Use It comes from.
Fill it in layers: moistened peat or soilless mix pressed into and over the pipe ring as the sponge, then potting mix above. This is the version for greens plus herbs, or for a crop that outgrows a bucket; zucchini in pots needs this size. It’s also much heavier when full, so run it past your lease and keep it against a wall.
Deeper reservoir for thirsty, shallow-rooted plants
For strawberries, lettuce and other shallow-rooted plants that want constant moisture, stack a second ring of pipe on the first in the tub version and move the drain hole up to just below the new pipe height. The reservoir roughly doubles, and the moist zone still sits about 4 inches above the water line.
One bucket and a lid, no second bucket
If you only have one bucket, the lid becomes the platform. Cut the lid down so it drops inside the bucket, drill about 15 holes at 5/16 inch through it, and set it on three 2.5-inch feet cut from 4-inch drain tile. Drill a 3/4-inch overflow 2 inches up the side, fit the same tubing and milk jug, and fill the space under the lid with compost or moist mix as the wick.
It’s the lightest and quickest of the three, with a shallower reservoir, so expect more frequent refills.
Frequently Asked Questions
Can I grow two plants in one bucket?
For fruiting crops, no: one tomato, pepper or eggplant per 5-gallon bucket is the standard, and a second plant would split a reservoir that can already run dry in about a day in midsummer. Small herbs are different. A few basil plants share a bucket comfortably. For a mixed planting of greens and herbs, build the muck tub version in Variations.
How do I tell how much water is left in the reservoir?
Slide a thin wooden dowel down the fill tube to the bottom, pull it out and read the wet mark, the way you’d check a car’s oil. A bucket that tips noticeably lighter is another sign it’s running low. If you’re unsure, pour until water reaches the overflow; anything extra goes to the jug, so the roots never end up sitting in it.
What happens when it rains?
Rain soaks the mix from the top, and the excess drains down into the reservoir and out through the overflow, so one heavy storm can fill the jug. Check it after a downpour and empty it before it spills onto the floor. If storms are forecast while you’re away, stand the jug in a wider tray or tub that can catch any spillover.
Do I always have to fill through the tube?
For routine refills, yes. The tube sends water straight to the reservoir, where wicking moves it up evenly. Water from the top only in two cases: once on planting day to settle the mix, and every few weeks for the plain-water flush that clears salt buildup, as described in How to Use It.
What Actually Matters
Three details decide whether this container works: the overflow sits below the inner floor, the wicking column is packed with moist mix, and the fill tube is capped. Everything else is adjustable.
If you only get one of them perfect, make it the overflow height, because it’s the one mistake you can’t fix without the drill coming back out. Then make the jug a habit; it’s what lets a renter run a reservoir planter without a thought for the floor below.
The next action is small: this week, ask a bakery or deli for two frosting buckets, pick up the hole saws, and set aside one afternoon. Put basil in the first bucket if you share the apartment with a cat or a dog, and a tomato in the second once you know how fast your balcony drinks. After that, the Balcony Garden guides can fill the rest of the railing.
Sources
- University of Kentucky Cooperative Extension – Self-Watering Wicking Container (AEN-157) – 4-inch capillary rise, tub dimensions, cap, refill intervals, freeze drain.
- University of Maryland Extension – Self-Watering Containers – design, milk-jug catch, lid-separator dimensions, first-fill volumes, daily summer watering.
- UF/IFAS Extension, Pinellas County – DIY Sub-Irrigated Planter – hole sizes and counts, overflow position, 45-degree cut, bag cover.
- Illinois Extension – Container Gardens: Soil, Fertilizing, Watering, Containers – soilless mix, headspace, feeding, leaching, dark containers overheating.
- University of Maryland Extension – Fertilizer Toxicity or High Soluble Salts in Indoor Plants – salt symptoms and flush volume.
- Oregon State University Extension – No yard? Grow vegetables in containers – 5-gallon size for fruiting crops, 6 to 8 hours of sun.
- University of Maine Cooperative Extension – Bulletin #2762, Growing Vegetables in Container Gardens – at least 6 hours of sun.
- University of Wisconsin-Extension – Container Gardening (A3382) – container weight, balcony load, wind.
- Ask Extension (Oregon State University) – Is it safe to grow food in regular 5-gallon buckets? – food grade as the safest choice.
- CDC – Control Mosquitoes Outside Your Home – weekly empty, scrub, turn over or cover rule.
- ASPCA Animal Poison Control – Tomato Plant; Basil; Toxic and Non-Toxic Plants – tomato toxicity and signs, basil non-toxic.
- ASPCApro – Fertilizers: A Growing Problem for Pets – ingestion risks and storage.